Everyone has that something that makes you weak at the knees. That one thing you always crave no matter what time of day it is, or what season it is or where you may be. You know what I mean, right? For me, that thing is ice cream. I have A-L-W-A-Y-S had a passion for ice cream- a craving crush. My earliest ice cream memory was going to the supermarket with my parents and seeing the white/brown and pink half-gallon of Neopalitan ice cream go into the cart. Then there were the late night ice cream soda float sessions with our Dad who has always had a huge sweet tooth. I blame him for mine and thank him all the same.
One of my all-time favorite milk shakes consists of bananas and chocolate ice cream and don’t get me started on Ben and Jerry’s Chunky Monkey okay? Yeah, that good. So I decided to try my hand at my own frozen creation and Chocolate Monkey ice cream was my labor of love. It’s not overly chocolatey, contains both semi-sweet and milk chocolate to balance out the chocolateyness paired with ripe, fresh and creamy bananas. I love to add a mix-in and a swirl to all my ice creams. So to take this ice cream to “rock star status” I add homemade banana caramel (say what??!) and walnuts! Can you say Booyah!!
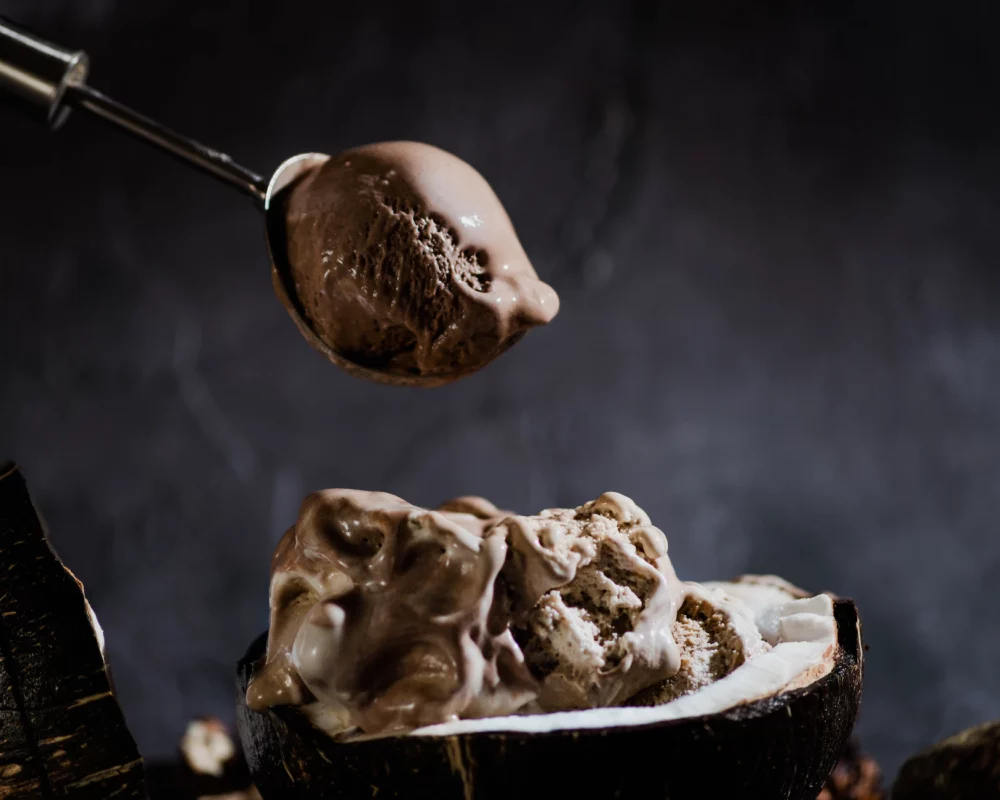
I know you’re gonna love this Chocolate Monkey Ice Cream because of its smooth, silky texture and hint of cinnamon and banana. It just might be the best chocolate ice cream you’ve ever had!
- PREP TIME 5 hours
- COOK TIME 1 hour
- TOTAL TIME 6 hours
- Recipe type: Dessert
- Cuisine: American
- Serves: 4
INGREDIENTS
Ice Cream
- 2 cups heavy cream
- 4 ounces of bittersweet or semisweet chocolate morsels or chips
- 3 ounces milk chocolate morsels or chips
- 1 cup whole milk
- ½ cup sugar
- pinch of salt
- 2 large egg yolks
- 1 spotted, ripe banana
- a dash of cinnamon (less than ⅛ teaspoon)
- 1 teaspoon vanilla extract
- ½ cup of walnuts, chopped
Banana Caramel
- ¾ cup sugar
- 1 spotted, ripe banana
Equipment/Tools
- medium saucepan
- small saucepan or skillet
- whisk
- silicon spatula
- teaspoon
- 2-3 mixing bowls
- infusion hand blender or standard blender or food processor
- mesh strainer
- ice cubes and water for an ice bath
INSTRUCTIONS
Ice Cream Part I
- Warm the two cups of heavy cream in a medium saucepan. Bring to a boil, reduce heat then add the chocolate, stirring until smooth. Remove from the heat. In a separate medium bowl whisk the milk, sugar, salt and egg yolks. Add a little of the warmed heavy cream to the milk/egg mixture to warm it up. Then add all of the milk/egg mixture into the sauce pan. In a separate bowl, break the banana in chunks and puree it with the infusion hand blender. Add it to the sauce pan.
- Stir the mixture constantly over medium heat with a heatproof, silicone spatula, while scraping bottom. Watch the mixture closely as it will thicken in 2-5 minutes. Dip a teaspoon into the chocolate mixture and check that the back is nicely coated. Pour the custard through a strainer into a large bowl making sure the mixture is smooth. Stir in vanilla. Place the bowl in an ice bath and stir for a few minutes until mixture is no longer hot. Pour mixture into a plastic container using the spatula to scrape the sides of the bowl. Refrigerate for a minimum of 4 hours
Banana Caramel
- Puree one ripe banana and set aside. In a small saucepan or skillet spread sugar evenly in a layer. Heat the sugar over medium heat, stirring to make sure the sugar melts evenly. The sugar will bubble and begin to dissolve. The sugar will begin to smoke and become a deep amber color. Move caramel around to make sure there are no sugar granules that still need to be dissolved.
- Once all of the sugar has melted, remove it from heat and wait until the steam subsides. Whisk in the pureed banana. Gently stir the mixture over medium heat until it turns a beautiful golden brown. At first it will look separated but as you continue to stir it, the mixture will be more uniform. Once the caramel is one color remove from heat. Let the mixture cool to room temperature before tasting and then adding to ice cream.
Ice Cream Part II
- Once the mixture has thoroughly cooled (I like to leave mine overnight 🙂 use a spatula to stir it.
- Pour it into your ice cream machine and follow the manufacturer’s instructions. Once the ice cream is finished churning you can add the caramel and nuts during the last two minutes of churning and then serve or store in plastic contain. You can also scoop a layer of ice cream into container and sprinkle ice cream layer with nuts and drizzle the banana caramel. Then repeat. Continue until all of the ice cream has been added. Put in freezer for 2 hours then serve.
- Overall cook time includes ice cream churning.
- Makes 1½ quarts of ice cream.
NOTES
If the ice cream base is sufficiently chilled it, should only take about 45 – 50 minutes to achieve the right texture.
Homemade ice cream is life transforming. It’s true. It is the ultimate feel-good food and I can promise you it is universal. I mean who doesn’t love ice cream? I don’t know one person that doesn’t. But homemade is phenomenally better than store-bought on so many levels and once you make it you will never, ever want to buy ice cream from the store. You know what they say: once you go fresh-churned, you never go back baby!
Why YOU should make freshly-churned ice cream:
- it’s totally fresh
- you have control over the quality of your ice cream
- the fresh taste can not be compared to store-bought ice cream
- you have the flexibility of creating any flavors your heart desires
- it’s much cheaper than buying ice cream from the store or ice cream shoppe
- your family and friends will think you are a rock star!
- you gain major coolness points
- ice cream keeps you cool during those hot summer nights
- 24 hour access to ice cream when that ice cream craving is unleashed
- it just makes you feel good all over!